 Ready for a challenge? Create a game using our assets from July 17th to 19th! 🎉
Those of you who have read my previous blog post know how easy it can be to create basic game art. Next, we'll add lighting, textures, and details. There's a trick for every effect, whether you want to draw rocks, foliage, or a giant robot. Let's dive right in and have a look at different shapes, colors, textures, and other details!
Shapes
Basic shapes are the basis of every drawing. A complex composition can be created by rotating, scaling, and positioning these shapes. Think about how a complex figure can be built using only a few basic shapes (like those shown below). This is an excellent starting point for your sprite.

Colors
You might want to indicate that a shape or sprite is made of a certain material or has a particular purpose. 3D models can be easily tweaked to look like they do in real life by tweaking material settings. You can apply some tricks to 2D art to achieve this, starting with color.
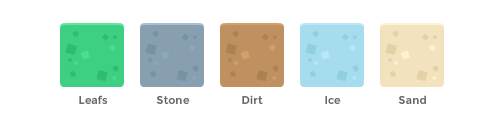
In the image above, the same texture is applied to blocks of different colors. The color alone would tell most players what these materials are. However, textures are equally important, so let's see a few tricks to create some basic ones.
Textures
Textures and patterns add a bit of detail to otherwise boring surfaces without straying too far from the overall look of the sprites. Duplicating a tiny sprite along the surface is the easiest way to create a texture.
You can create natural looking textures for foliage using an egg shape, triangle, tiny leaf, or even just a rectangle. Experiment with different shapes, it doesn't have to be realistic!

Other materials can also be treated with these techniques. In natural materials, it's best to scatter the details randomly; in man-made materials, it's best to follow a grid or structure.
Creating seamless textures can be challenging, but there's a trick to it. Create the shape you want to use for the texture, duplicate it at all corners, and remove the overflowing lines. Using the same shape, fill the remainder of the shape. As a result, you can place tiles together and the shapes will align perfectly.
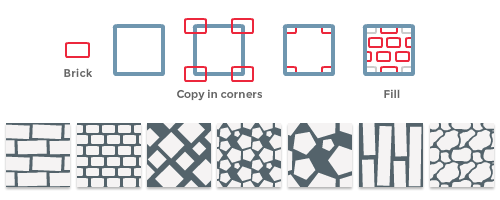
For brick walls, cobblestone roads, or wooden planks, try different shapes. You should also duplicate any shapes that aren't in the corner, but overflow on either side.
Lighting
It can be difficult for artists with little to no experience to determine where shading should be applied. A common mistake is to apply 'pillow shading', which involves shading in all directions. If there is only one light source (the sun), shading should be applied in one direction.
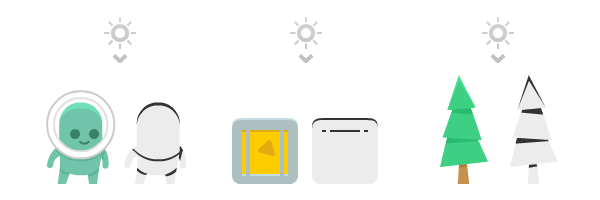
By placing the light source directly above the object, you can save a lot of work when planning to flip sprites horizontally. It's not commonly done, but it will save you some time.
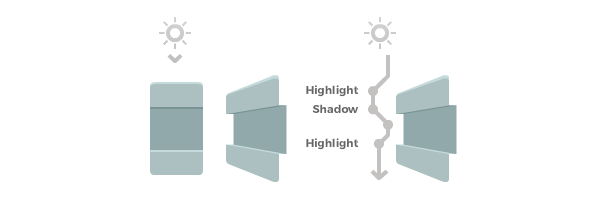
Not sure where to apply shadows or highlights? You can draw an imaginary line to see where shadows would be cast and where highlights would be needed by picturing your sprite in 3D.
Details
Metal
Use shadows and highlights to add depth to metal surfaces. Bolts and screws can be added to add even more detail. The easiest way to draw one is to create a circle. They come in all shapes and sizes. If you want to add a bit more detail, add a darker diagonal line (or two).
Most metal you’ll come across isn’t brand new and has some wear and tear. Create a single line and duplicate it below the first line, make the top line a darker color and the bottom line a lighter one. You can create straight lines or go wild and scribble some lines for more realistic scratches.
Metal plating can be done by adding random shapes of darker and lighter color, adding screws (or even simple circles) in the corners really conveys the plating effect.
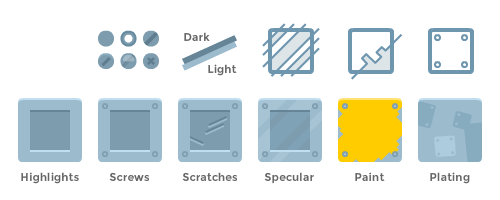
Create a specular effect by drawing several diagonal lines, change the color to a slightly lighter one than the background. If you’re more familiar with drawing tools you can use a gradient (from light to transparent) for more realism.
Painted metal often chips along the edges, add ragged edges (a combination of triangles, or random geometric shapes) around the outline and show the bare metal color.
Paper/fabric
When drawing either paper of fabric try to stay away from straight lines. Draw a line and bend it slightly, then duplicate and flip it to create a wavy line. Use these wavy lines to create the shape you need, as shown below.
Add tears to paper by adding randomly placed triangles along the edges. Place a triangle and cut away the shape inside. Try different sizes and positions for a random effect.
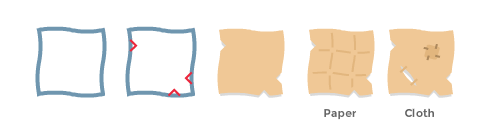
Maps and flyers often get folded, there’s an easy way to give an effect like that to your sprite. Simply draw a grid of lines on the sprite, but never let any of the lines cross. Cut away (or erase) the crossings. Pick a slightly darker color than the sprite itself for the grid.
If you’re drawing cloth or a fabric (sails, awnings, tents etc.) you can add patches or cuts to add wear. This works especially well if the material needs to look a bit older.
Wood
When drawing things made out of wood it’s a good idea to first draw a couple of boards, and using those to build the structure. Use straight boards for nearly created objects, change the size, position, and rotation to random values for crooked or old objects.
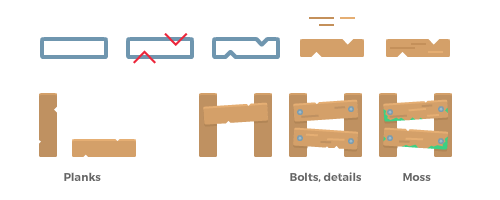
You can also apply some techniques for other materials to wood. Torn paper, screws, and scratches work really well for making wood look a bit more natural.
Stone
There are a few simple ways to add moss to stone. The first is to create small stars and randomly placing them along the surface, preferably close to the sides. A different way is to create edges (just like the chipped metal) using a green color.
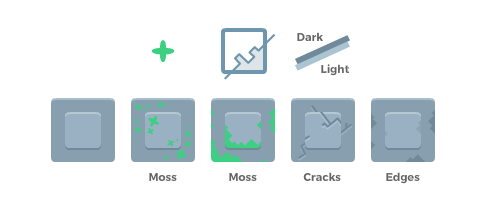
Similar to the scratches of the metal you can add cracks and edges to stone.
Final words
You've now learned a few tricks to create sprites, add shading, and add textures. However, there is still much more to explore, so I would recommend trying and experimenting for yourself. The more you experiment (and fail!), the better your next sprite will look.